
The Milk Bottle Dove Project
A few simple snips with quality scissors, and a flattened milk bottle teases the crafty soul like a blank canvas inspires an artist. Instructions for making a satisfying craft project using milk bottle plastic and including suggestions on how and where to find inspiration to design personalised projects to create joy particular to you.

May I invite you to consider some different approaches to answer the question of ‘what to make?’
In generations past, hand-crafting skills were honed by necessity. Textiles were expensive so clothes were mended and worn–out clothes were recycled into quilts and rugs. Buttons and zips were unstitched and used in a new dress. Socks were darned, trousers were patched and Dad could fix almost anything around the house with the tools in his shed and the bits and bobs collected and stored in jam jars over the years. A lot of time and energy was devoted to mending and fixing items around the home, not because these jobs were a thrilling creative outlet for the adults of the household, but because they needed to be done.
Those of us lucky enough to live in the Western world are fortunate to be able to now think of hand-crafting skills not as work but as pleasure. Using our hands to make something has become a past-time and not a necessity. This freedom from the toil of endless mending has evolved into a situation where we are making something by hand for the experience of simply creating, of seeing a project through to completion.
When something is to be mended or made from necessity the choice of project has been made for you. Now that we want for so very little, and have access to so much, choosing a project has become the difficulty. We are literally spoilt for choice.
If we have the privilege of making something of our choice, then with respect to the planet and it’s dwindling resources, let’s make it with recycled materials if we can and if we’re purchasing the materials, let’s make something beautiful, useful and fairly durable.
This might mean your thinking about your next craft projects will need to adjust a little:
- Five minutes on a sewing machine does not an heirloom make.
- Long-term projects are worth taking on as they can provide great succour and satisfaction to the maker and the finished item can take on a personal significance because the project saw the crafter through a particular period in their life.
- Don’t make rubbish craft items and especially don’t give rubbish craft to people as gifts. If it gives you a little pang in your heart to give the finished item to someone, it’s worthy to pass on.
- Be confident. Your eyes are just as good as anyone else’s.
- Sign your work with your own logo.
- Date your work, if it’s a beautiful piece it may well survive maybe longer than you.
Here are some approaches in how to begin to think about creating your very own, individual craft projects.
Four notions to inspire you to create your own joy:
Re-purposing as inspiration
The world has changed so that we’re not mending things like our great-grandparents did, if something’s not working, or is a bit worn, we toss it out and buy another. Which is not all bad, because if lots of people are making widgets, lots of people have jobs and people with jobs can feed their families and need widgets themselves and then there’s more money in society to throw at science to make the world a better place and so it goes on. But for some of the time, we can fix the widgets before buying a new one, or we can use the old widget to make something new.
Think before you throw something out. Look at the item, upside down, inside out, could it be cut flat, or into strips, could it hold something, does the shape of the item resemble something? How many would you need to collect before you can start? Think of it as recycling with a Rorschach inkblot test approach: What do you see?
Your childhood as inspiration
It could be the colours you loved in the illustrations from a favourite story time book. Get some wools in those tones and start experimenting. Maybe you never got to make a macramé owl at school. Get onto the internet and find out how. Or your teacher never let you go wild with the Tjanting tool, the tool to draw on fabric with hot wax whilst making batik when you were seven years old. (We were forced to do a particular and very boring design I thought and I still have a yen to have a go at batik again, some three decades later). It could be the lyrics of a song which you could stitch or paint onto something. The flowers in your Granny’s garden, all the vegetables you loathed as a child, all the lollies and icecreams you adored.
Draw them, write about them, search for images of them on the web, take your own photographs, think about them. Go back and visit with yourself as a child and try and remember some of things that thrilled you back then. The possibilities are endless…
Art as inspiration
Tracing is not a crime. It’s learning about the line.
If you admire a work of art, creating something based on the line or design in that work is not copying, but a way of gaining a deeper understanding of the artwork, (just remember to attribute).
An old art school exercise for students was to copy a famous work of art, mimicking colours and brushwork exactly giving students the chance to hone technique without the burden of coming up with an original idea. It’s not such a common practice now, but is an amazing way for art students to learn different techniques and approaches to painting. This idea can be applied to craft, in a variety of ways:
- Take an element from the work and expand on it,
- You like the colours used in the painting? Adopt the same palette and go from there. Replace paint with fabric or tapestry wools or felt,
- Reduce the scale of the work, or take only a corner section of the work and make it large.
Looking and thinking about an artwork from all these different perspectives will give you an insight into design, line, scale, proportion and balance and contribute to developing your own creative response.
Industrial design as inspiration
They are the elements of our life we accept without a thought as to how they came about. Biros, microwaves, roadside reflective cat’s eyes, Velcro, street signs, zips, egg whisks, email, the spatula. Somewhere, someone thought up a solution to a problem and made a prototype and then refined the concept until it became so good everyone used it, and half the time we got along just fine without it before it came into the world, but now we can’t imagine life without it.
Look around you. Get dressed and think about all the trimmings and fastenings on your clothing and begin a mental list of these items. Who thought all of that up? How did it come about? Go into the kitchen and make a pot of coffee. Go directly to your computer with your coffee and look up every item on the list including the coffee. Find out how it all came about. Get the background story on every item. You get the idea. Endlessly fascinating once you’re into it and a potential pathway to truly original creativity.
The Milk Bottle Dove
Repurposing as inspiration (including pattern and instructions).
A plastic milk bottle. A two-litre, squarish, tricky-to-pour-when-it’s-full milk container. Seen daily by most of the population. There’s probably one tossed into the recycling bin every second of the day. And yet, if reduced from a three dimensional item to an almost flat piece of plastic with a few simple snips of decent scissors, the flattened milk bottle teases the crafty soul like a blank canvas inspires an artist.
Here is one solution as to what could be made from this marvellous material.
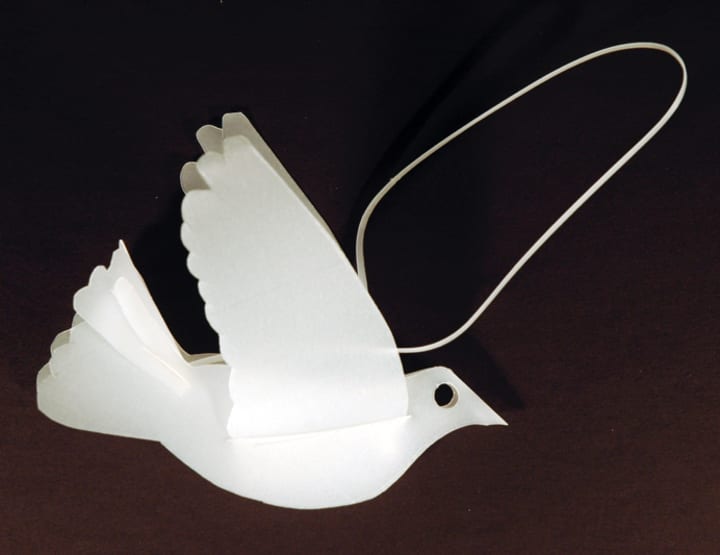
A dove. A Milk Bottle Dove.
Doves have been synonymous with peace for centuries and most of us probably think this is because of the Christian story of the dove released by Noah and returning with an olive branch in it’s beak; a sign that the floods had receded. In Noah’s story, it’s the olive branch itself that is the sign for peace, and could be the origin of the phrase “extending an olive branch”.
Our modern association with the white dove and peace began when Pablo Picasso designed a lithograph for the International Peace Congress in Paris in 1949 prominently featuring a white dove without an olive branch, thus presenting the white dove as an international symbol of peace and harmony whilst transcending any specific religious connotations.
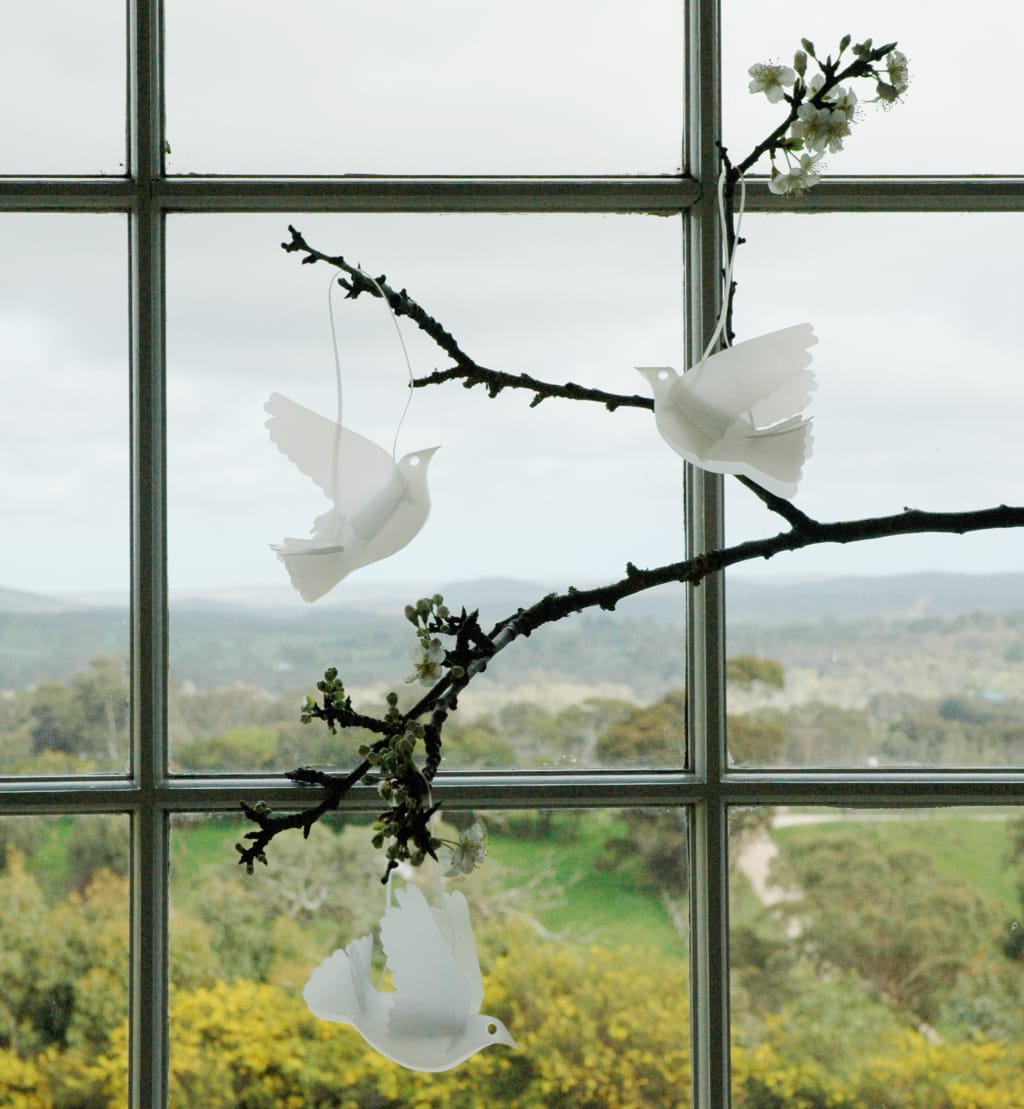
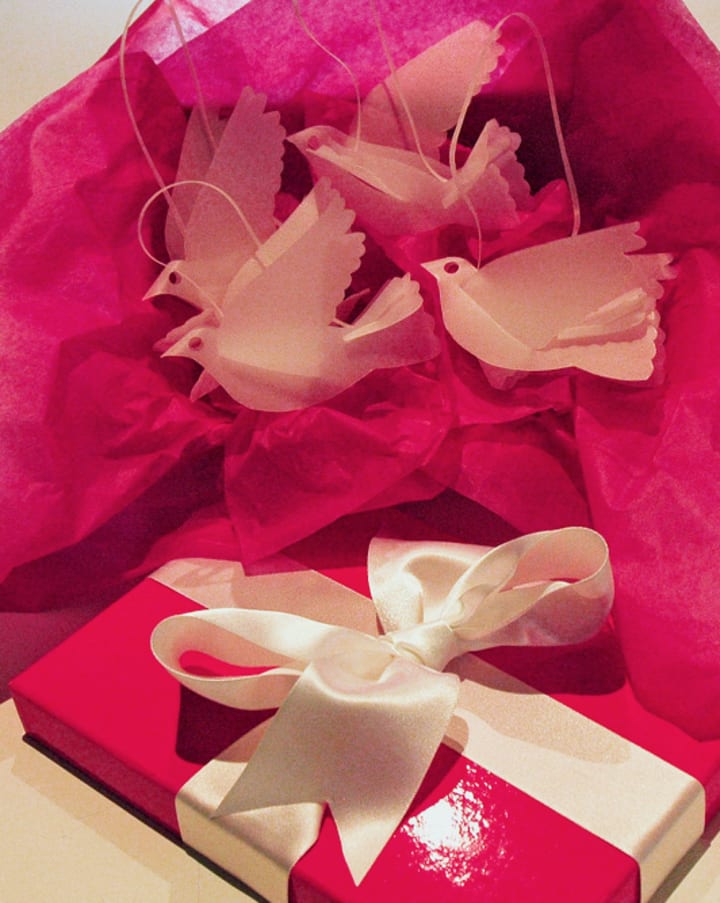
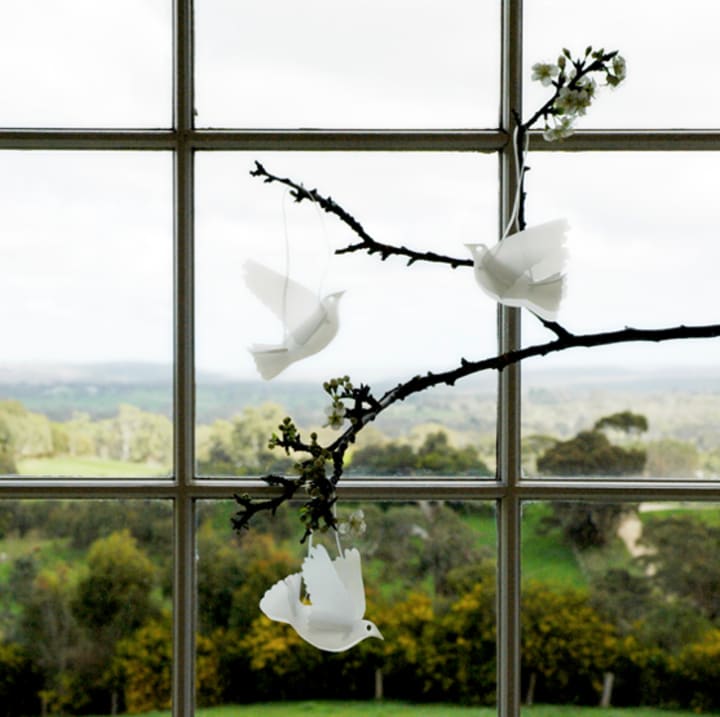
With this project you can fashion a flock of white doves to decorate a window, they look particularly lovely with a little light behind them and of course they look delightful hanging on a Christmas tree. A small flock nestled in tissue paper in a gift box would make a perfect present for a special someone and I guarantee they won’t guess what they’re made from!
You will need:
- Clean plastic milk containers: 2 litre square based size (3 containers will make 4 doves)
- Sharp scissors capable of accurately cutting milk bottle plastic
- A lead pencil for tracing (2B)
- An eraser to remove pencil marks
- Small hole single hole punch
- Standard single hole punch
- Fine blade for cutting insertion lines
- Cutting mat
- A hard copy of the pattern to work from
Instructions
Wash the containers well with detergent. Remove the labels from the containers by either slipping the sleeve off or in the case of adhesive labels, filling the milk bottle with boiling water and then peeling the labels off. Empty the bottle and apply the solvent to the sticky residue and wipe off. Wash the outside of the bottle with detergent to remove any remaining solvent.
Using your scissors, cut down through the opening of the bottle to through one of the four corners to the base. Cut the pouring spout section off following a line parallel to the bottom. Cut and remove the base so a long plain rectangle of plastic remains.
Place the plastic in front of you lengthways and notice the 3 bends that were the corners of the container. Make sure the bends are pointing upwards, the dove’s wings use the memory of the original fold to give the impression of “lift” or that the bird is truly flying.
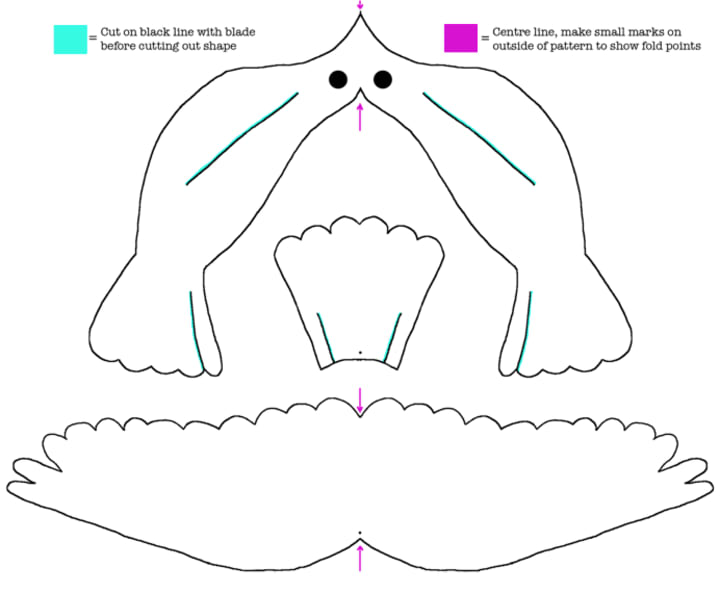
Cutting layout (not to scale)
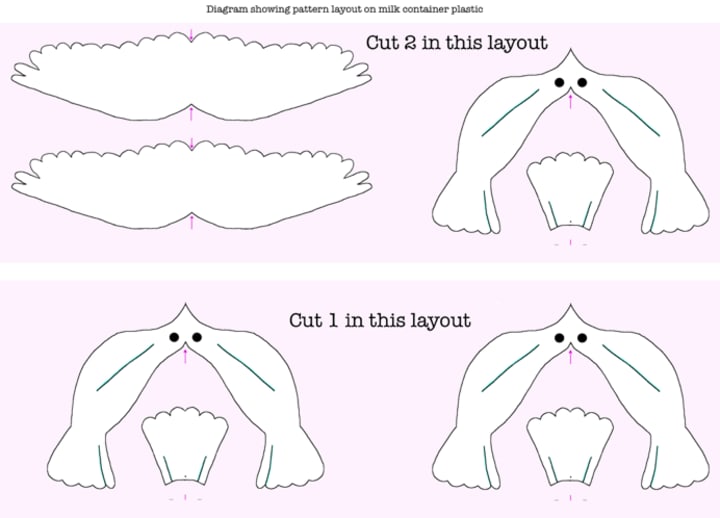
Tracing out the wing piece
Line the pattern up underneath the plastic so that the centre marks of the wing are directly under a fold and that there is enough room for the entire wing span to be cut out. Trace the pattern onto the plastic with a pencil, on only the RHS (right hand side) edge of the wing, but making a small mark at the LHS (left hand side) to show the entire width of the wing. You will be folding the wing in half to cut both sides of the wing at the same time.
Tracing out the body and tail piece
Again, line the pattern up underneath the plastic so that the centre marks of the body (at the head) are directly under a fold and trace the pattern on the RHS side only. Mark the eye only on the RHS, again making a mark on the furthest LHS to guide you where to cut the whole piece of plastic in half before finely cutting out the body outline.
The wing and tail insertion points on the body piece need to be marked for BOTH sides. You will see that the tail-piece fits in the middle of the pattern underneath the body piece, also on the centre line. Trace the entire tail-piece, carefully marking the insertion points which will need to be cut by blade after cutting out the shape. You will cut the tail-piece as a whole piece (no fold).
Cutting out all the pieces
Roughly cut the wing section from the dove’s body section so you have two separate pieces to finely cut out (a folded wing and a folded body), using your guide marks to avoid cutting into the LHS of the each piece.
Carefully fold the wings on the fold line, and holding the wing firmly between thumb and forefinger, cut out the shape through both thicknesses. Holding the fold together firmly will help to attain a symmetrically finished silhouette. Make the hole for hanging at the mark given using the small single hole punch. Repeat the cutting method for the body of the bird.
Holding the body piece together and checking the cut insertion points are even, cut out the body and then make the hole to represent the eye, at the mark made previously, using the standard sized single hole punch, punching through both layers.
Take the blade and cut the insertion points for the wing piece and tail-piece in the body of the bird, checking that the cuts have been made all the way through the plastic.
Carefully cut out the tail-piece with scissors, as one piece with no centre fold. Make the hanging point anchor at the base of the tail using the small single hole punch and cut the insertion points with the blade.
Erase any pencil markings showing on any of the pieces. Be sure to erase all marks for a perfect pure white dove effect.
The hanging strips
Allocate one length of plastic (one bottle) for the hanging strips. Cut off the moulded ridge edges and working with sharp scissors, cut 2mm strips the entire length of the plastic. You will need one hanging strip for each dove. Practice tying a simple knot and pulling it tight. You should find the plastic is remarkably easy to work with, if not, you could try putting the strips into hot water, then making the knot.
Assembling the dove
Slip the wings through the first side of the body, if your cuts have been accurate, this should be a snug fit. Make sure the wings go through in a “V” so that the wing tips are higher than the dove’s head. Follow the same wing through the second side of the body, and check that the wings are evenly spaced on both sides. Using the warmth of your fingers, or running the closed blades of scissors onto your cutting board over the plastic, straighten out any of the feathers that might have been dented going through the insertion slits. If the wing won’t wiggle through, remove the wing piece, open out the body and lengthen the insertion point a tad with your blade.
Slightly spread the tail wings out to reveal the wing’s hanging insertion point and to accommodate the tail-piece. Make a simple knot at one end of the hanging strip and clip the other end to a point. Thread the clipped end of the hanging strip through the underside of the wing and up through the dove’s body.
Pick up a tail-piece and push the sharp end of the hanging strip down through the tail-piece and make a knot. Slip the tail-piece insert into the top insertion points on the back tail. Clip the tails of both knots neatly and gently pull the hanging strip up so that both knots sit snugly under the dove’s body. Gently adjust the body piece on the wing so that the decoration can sit upright on the work surface without toppling to the side.
Why not hang them now in a window and enjoy the peace and prettiness of your efforts?

Other uses
Hoping you are inspired into your own making and creating.
Happy days ahead then! LaraJane
About the Creator
Lara Jane Townsend
Enjoying the process of creating: the planning, the preparation, the doing and the sharing.
My happy is Creating.Clever.Craft.
Keep reading
More stories from Lara Jane Townsend and writers in Lifehack and other communities.
How Programmatic Advertising Enhances Precision in Digital Ad Targeting
Digital advertising has experienced a quick transformation in the last 10 years and has transformed into a far less general, more manual, and more data-driven approach to target the right audience at the right time. With the competition for consumer attention increasing, companies are exploring smarter alternatives to provide consumers with relevant messages without spending the budget. It is here that automation and data are central to the current advertising approaches.
By Jane Smithha day ago in Lifehack
Carepod vs Miro Humidifier: Which Easy-to-Clean Humidifier Is Right for
Dry air can be a real pain, so when people ask about Carepod vs Miro humidifier, I get why the choice matters. I notice how things like cold U.S. winters, indoor heating, and easy cleaning shape what actually works at home, and I like focusing on the details that affect day-to-day comfort. Here’s what stands out, where each falls short, and which one may fit your space better—stick with me and you’ll know which way to go.
By Mohammed mamun5 days ago in Lifehack
The Pride Flag and the Diversion
For nearly a decade, the LGBTQIA Pride Flag rippled in the wind at Christopher Park, a kaleidoscope of color staked into the soil of America’s first national monument to LGBTQIA+ liberation. That flag came down this week. Federal officials, citing new guidance from the Trump Administration, silently lowered the rainbow flag from its pole across the street from the Stonewall Inn. The birthplace of the modern gay rights movement now flies only the United States flag.
By Tim Carmichael3 days ago in Pride


Comments
There are no comments for this story
Be the first to respond and start the conversation.