
Easy Sourdough Bread Recipe for Beginners
A simple, no-stress way to bake your first sourdough loaf at home — no fancy tools, just patience, flavor, and a little kitchen magic.

The first time I baked sourdough, I thought I’d ruined it. The dough felt too sticky, the timing made no sense, and my kitchen looked like a flour explosion. But when I pulled that first golden loaf from the oven, I understood why people fall in love with the process.
Sourdough isn’t just bread—it’s patience, rhythm, and the quiet joy of watching simple ingredients come alive. This version of easy sourdough bread skips the complicated jargon and long rest times that scare beginners away. With a little starter, some flour, and a few folds, you can make a loaf that smells like a bakery and tastes even better.
If you’ve ever wanted to try sourdough but didn’t know where to start, this guide will walk you through every step—the easy way.
Why This Easy Sourdough Bread Recipe Works for Beginners
Let’s be honest—sourdough has a bit of a reputation. Everyone talks about starters that take weeks, precise folding schedules, and fancy tools you’ve never heard of. The truth? You don’t need any of that to bake a beautiful loaf at home.
This easy sourdough bread recipe is beginner-proof because it leans on simplicity, not perfection. You only need four ingredients: flour, water, salt, and an active starter. The process is flexible—you can start in the morning and bake the same day, or let it rest overnight for deeper flavor. No stand mixer, no Dutch oven drama, no stress.
The secret lies in time, not effort. As the dough rests, natural yeast and bacteria quietly do the work, building structure and flavor. All you really do is guide it with a few stretch-and-folds and some patience. Once you see the dough puff up and smell that tangy, warm scent from your oven, you’ll understand why sourdough keeps people hooked.
This is the kind of bread that fits into your life—not the other way around.
Ingredients You’ll Need for Easy Sourdough Bread
Here’s the good news — you don’t need a pantry full of fancy ingredients to bake great sourdough. In fact, the best loaves start with the simplest list possible. If you’ve got flour, water, salt, and an active starter, you’re already most of the way there.
Core Ingredients
- Bread flour (500 g / about 4 cups): Strong gluten gives your bread that chewy, airy texture. All-purpose flour works too, but your loaf will be slightly denser.
- Water (350 g / 1½ cups): Use room-temperature or filtered water if possible; chlorine can slow fermentation.
- Active sourdough starter (100 g / ½ cup): It should look bubbly and smell slightly tangy. That’s how you know it’s alive and ready to raise your dough.
- Salt (10 g / about 2 tsp): Strengthens the gluten and enhances flavor.
Optional Add-Ins
Want to make your loaf your own? Try adding a drizzle of honey for a subtle sweetness, a spoon of olive oil for a softer crust, or a handful of seeds for a bit of crunch. You can even mix in herbs like rosemary or thyme for extra aroma.
Quick Tip
If you’re unsure about your starter’s strength, do the float test. Drop a spoonful into a glass of water—if it floats, you’re good to go. If it sinks, feed it and give it a few more hours.
Sourdough rewards intuition. Once you’ve made it a few times, you’ll learn to trust how the dough feels more than what the clock says.
Step-by-Step Instructions for Easy Sourdough Bread
Sourdough looks intimidating until you realize most of it is waiting. The magic happens while you’re doing other things — working, sleeping, or just living your life. Here’s the simple flow that turns flour and water into something you’ll be proud to slice.
Step 1: Mix the Dough
In a large bowl, stir together:
- 500 g bread flour
- 350 g water
- 100 g active sourdough starter
- 10 g salt
Use your hands or a sturdy spoon to bring everything together until no dry flour remains. It’ll look shaggy and rough — perfect. Cover the bowl and let it rest for 30 minutes. That rest, called autolyse, helps the gluten start forming on its own.
Step 2: Stretch and Fold
Now it’s time to strengthen the dough. Every 30 minutes for the next two hours, grab one side, stretch it up, and fold it over. Rotate the bowl and repeat three or four times. This gentle motion builds structure without kneading. You’ll feel the dough getting smoother and stronger each round.
Step 3: Bulk Fermentation
Cover the bowl and let it rest at room temperature for 3 to 6 hours. The dough should double in size and show bubbles near the surface. In cooler kitchens, this part takes longer — and that’s okay. The longer it ferments, the more flavor develops.
To check if it’s ready, poke the dough lightly. If the dent springs back slowly, it’s go time.
Step 4: Shape the Dough
Dust your counter with flour and turn the dough out gently. Shape it into a ball by folding the edges toward the center. Flip it seam-side down and let it rest for 20 minutes, uncovered. Then tighten the surface by pulling it toward you a few times. Place the dough seam-side up in a floured bowl or proofing basket.
Step 5: Proofing Options
You’ve got two choices here:
Overnight method: Cover and refrigerate for 8–12 hours. The cold fermentation deepens the flavor and makes scoring easier.
Same-day method: Let it rest at room temperature for 2–4 hours, until puffy and slightly jiggly.
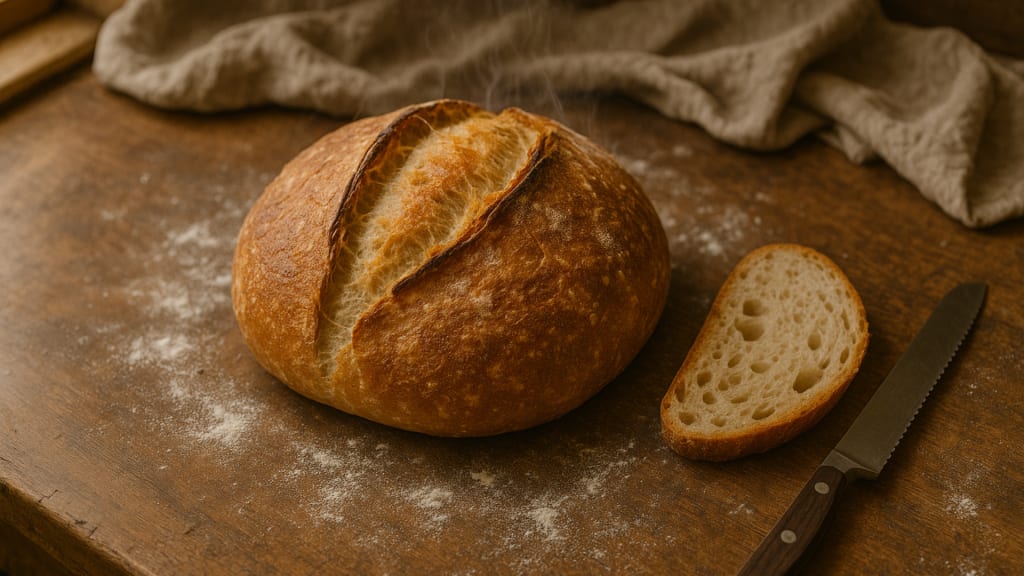
Step 6: Bake the Bread
Preheat your oven to 450°F (230°C) with a Dutch oven inside. When it’s hot, place your dough on parchment paper, score the top, and carefully lower it into the pot. Cover and bake for 20 minutes, then uncover and bake another 20–25 minutes until golden and crisp.
Cool it completely before slicing. That wait is hard — but worth it.
Baking sourdough is 90% patience and 10% instinct. Once you catch the rhythm, it starts to feel less like a recipe and more like a ritual.

Tips for the Best Easy Sourdough Bread
Once you’ve baked your first loaf, you’ll start noticing the small things that make a big difference — how warm your kitchen feels, how bubbly your starter looks, how soft or tight the dough is in your hands. These details are what turn a decent loaf into a great one.
1. Keep Your Starter Happy
Think of your starter as a tiny pet — it needs regular feeding and the right environment. Feed it at least 4 to 8 hours before baking so it’s at its peak. When it doubles in size, smells slightly fruity, and looks bubbly, it’s ready to go.
Quick check: Drop a small spoonful into water. If it floats, you’re good. If it sinks, it needs more time or another feeding.
2. Temperature Is Everything
Warm air speeds things up; cool air slows them down. Aim for a cozy 72–77°F (22–25°C). If your house is chilly, place the dough inside your oven with the light on. Too hot? Move it somewhere cooler — sourdough should rise slowly, not rush.
3. Don’t Watch the Clock
The best bakers watch their dough, not their timers. When it looks puffed, airy, and smooth, it’s ready for the next step. Every starter and kitchen behaves differently, so use your eyes and hands more than the clock.
4. Steam Makes the Crust
If you’re not using a Dutch oven, you can fake it. Place a small pan of hot water on the bottom rack while the bread bakes. That extra steam keeps the crust flexible so the loaf rises tall before crisping up.
5. Let It Cool — Really Cool
Resist the urge to cut in too soon. Hot bread continues cooking from the inside out, and slicing early can squash the crumb. Wait at least one hour for the texture and flavor to set.
Mastering sourdough isn’t about precision — it’s about rhythm. Once you learn how your dough behaves, you’ll bake with confidence every time.
Common Problems & Troubleshooting Easy Sourdough Bread
Every baker has a “what happened here?” loaf at some point. Maybe it didn’t rise, maybe it spread like a pancake, or maybe the crust could crack a windshield. Don’t worry—each problem has a simple fix.
The Bread Didn’t Rise
What went wrong: Your starter wasn’t active enough, or your kitchen was too cold.
How to fix it: Feed your starter twice before baking day and give it more time to ferment. If your dough hasn’t doubled after 6 hours, move it somewhere warmer.
The Loaf Came Out Dense
What went wrong: The dough was underproofed or over-handled.
How to fix it: Let it rise longer until it feels light and airy. Use gentle folds instead of kneading, and always let it rest fully between steps.
The Bread Is Too Sour
What went wrong: It fermented too long, or your starter was overripe.
How to fix it: Try shortening the proofing time or refrigerating the dough sooner. Feed your starter more often to keep the acidity balanced.
The Crust Is Too Hard or Burnt
What went wrong: The oven was too hot, or the loaf baked too long uncovered.
How to fix it: Lower the temperature by 25°F for the last 10 minutes, or brush the crust with a little olive oil after baking for a softer finish.
The Loaf Spread Out Flat
What went wrong: Weak gluten or overproofing.
How to fix it: Complete all stretch-and-fold rounds during the first few hours, and don’t let the dough proof past its peak. A tight shaping step helps it rise tall in the oven.
Every “bad” loaf teaches you something new. Keep a simple baking log — note your timing, temperature, and how the dough felt. You’ll start to spot patterns and fix problems before they happen.
Variations & Substitutions for Easy Sourdough Bread
Once you’ve nailed the basic loaf, it’s fun to experiment. Sourdough is flexible — you can tweak it for flavor, texture, or even dietary needs without breaking its natural rhythm. Think of this as your permission to play.
Whole Wheat or Rye Sourdough
Swap out up to half of the bread flour for whole wheat or rye. You’ll get a deeper flavor, darker crust, and a bit more chew. These flours absorb more water, so add an extra tablespoon or two to keep the dough soft.
Seeded or Herb Sourdough
Add sesame, flax, or sunflower seeds during your last stretch-and-fold round. For herbs, toss in a teaspoon of dried rosemary, thyme, or oregano right when you mix the dough. Seeds add crunch; herbs make your kitchen smell amazing.
Overnight Sourdough
If your day’s busy, shape the dough in the evening and proof it in the fridge overnight. The slow, cold rise adds flavor and gives you flexibility — bake it fresh the next morning when you have time.
Same-Day Sourdough
Need it faster? Use a little more starter (about 150 g instead of 100 g) and ferment in a warm room. You’ll get a lighter tang and a loaf on the table by dinner.
No Dutch Oven, No Problem
Bake your dough on a sheet pan or pizza stone. Preheat a metal tray on the lower rack, pour in a cup of hot water right before baking, and close the oven fast. That steam gives your crust the same lift you’d get from a covered pot.
Gluten-Free Option
Use 400 g of a gluten-free flour blend plus 100 g of brown rice flour. Add 1 teaspoon of xanthan gum for structure. The dough will look more like thick batter — that’s fine. Proof it 2–3 hours and bake in a loaf pan.
Every variation still follows the same pattern: mix, rest, fold, proof, bake, and enjoy. Once you’re comfortable with that rhythm, sourdough stops being a recipe and starts becoming a habit.
FAQs About Easy Sourdough Bread
Even the most confident bakers have questions, especially when they’re new to sourdough. These quick answers clear up the most common confusion and save you from kitchen panic moments.
Can I Make Sourdough Bread Without a Starter?
Not exactly, but you can fake it. Mix 150 g of flour, 150 g of water, and a pinch of instant yeast. Let it rest overnight. It’ll bubble and smell slightly tangy—close enough to a starter for a one-time bake.
How Do I Know When My Dough Is Ready to Bake?
Press a finger gently into the dough. If the dent springs back slowly, it’s proofed. If it bounces back fast, it needs more time. If it collapses, you’ve gone too far—bake it right away to save structure.
Do I Need a Dutch Oven?
It helps, but you can totally bake without one. Use a hot pizza stone or sheet pan, and add a pan of boiling water to the bottom of your oven. That steam is what gives the bread its crusty lift.
How Long Does Homemade Sourdough Stay Fresh?
About three days at room temperature if stored in a paper or linen bag. To keep it longer, slice and freeze it. You can pop frozen slices straight into the toaster anytime.
Why Is My Bread Too Sour?
It usually fermented too long or your starter was extra hungry. Try shortening the rise time or giving your starter a fresh feeding before baking.
Can I Freeze the Dough Before Baking?
Yes. Shape your dough, freeze it, and then thaw it in the fridge overnight before baking. The rise will be slower, but the flavor holds strong.
Sourdough is a learning process, not a test. Once you understand how it behaves, you’ll start trusting your instincts more than the timer—and that’s when the magic happens.
Serving & Storage Ideas for Easy Sourdough Bread
Pulling a fresh loaf out of the oven is already satisfying, but how you serve and store it makes all the difference. The goal: keep that crisp crust and soft interior as long as possible while finding new ways to enjoy every last slice.
Serving Suggestions
Fresh sourdough works with almost anything. Try these simple pairings:
- Thick slices with butter and flaky salt — the classic move.
- Toasted with smashed avocado or a fried egg for breakfast.
- Grilled cheese with sharp cheddar and tomato soup.
- Cubed and toasted for homemade croutons or breadcrumbs.
If you’ve never tried warm sourdough with olive oil and a sprinkle of sea salt, start there. It’s ridiculous how good it is.
How to Store It
Skip plastic. It traps moisture and ruins that perfect crust. Instead, store your easy sourdough bread in a paper bag, bread box, or wrapped in a clean towel. It’ll stay fresh for 2–3 days at room temperature.
Freezing and Reheating
To make your loaf last longer, slice it first and freeze individual pieces in a sealed bag. When you’re ready for toast, pull a slice straight from the freezer and drop it into the toaster. Whole loaves can be reheated in the oven at 350°F (180°C) for 10 minutes to bring them back to life.
Quick Refresh Trick
If your bread feels a little stale, sprinkle it lightly with water and warm it in the oven for five minutes. It’ll come out crisp and fresh again — almost like new.
Bread this good deserves to be enjoyed fully, from the first warm slice to the last crunchy toast.
Conclusion — Mastering Easy Sourdough Bread at Home
Making sourdough feels like magic the first time it works. You mix four simple ingredients, walk away for a few hours, and somehow end up with a loaf that looks—and smells—like it came from a bakery. But the real secret isn’t luck. It’s patience, rhythm, and learning to trust your hands.
Every loaf teaches you something. Maybe you’ll forget the salt once, or pull it from the oven a little early. That’s part of it. Sourdough rewards practice, not perfection. The more you bake, the more you understand how your starter behaves, how your dough feels, and when it’s just right to bake.
Once you’ve mastered this easy sourdough bread, you can branch out—try a Sourdough Baguette Recipe (Easy) or explore an Easy Gluten-Free Sourdough Bread Recipe. Both follow the same natural process that makes this one so satisfying.
So grab your bowl, feed your starter, and bake something that feels a little bit like accomplishment. Because honestly, there’s nothing quite like the sound of your first sourdough loaf cracking as it cools on the counter.
About the Creator
Keep reading
More stories from Emily Quick and writers in Feast and other communities.
Candy Recipes Homemade: How to Make the Perfect Fudge at Home
I can still remember the very first time I made homemade fudge. It was a chilly December afternoon, the house smelled of pine from the Christmas tree, and my kitchen quickly filled with the rich aroma of melting chocolate. What began as a simple attempt to make edible gifts for friends turned into a tradition I’ve cherished ever since. That’s the magic of candy recipes homemade—they’re more than sugar and chocolate; they’re little bites of memory, nostalgia, and joy.
By Emily Quick4 months ago in Feast
From Ocean to Plate: How Farmed Salmon Is Redefining Seafood
You are currently located in the seafood aisle because you are looking at a properly packaged salmon fillet. The product appears to have reached its ultimate state of excellence. The product appears to be exceptionally flawless. The product appears to be exceptionally flawless. The product appears to be exceptionally flawless. Your mind begins to question the actual source of this item.
By Sonpal Singha day ago in Feast
Flavorful Feast
The Chinese New Year's Eve dinner, or Nian Ye Fan, is more than just a meal—it’s a cherished tradition filled with symbolic dishes that represent wishes for prosperity, health, and good fortune in the coming year. These ten classic homestyle recipes are perfect for creating that special festive spread at home. They balance flavor, meaning, and tradition, ensuring your family table is both abundant and auspicious. Let's get cooking!
By yue . shui3 days ago in Feast
One Unchecked Box
"Republished" because it was the only way to add the embed for the newly recorded audio version of this story due to the Top Story badge. Plus it serves as a nice, informal announcement of the podcast's revival for another season (go subscribe!):
By Stephen A. Roddewig7 days ago in Fiction


Comments
There are no comments for this story
Be the first to respond and start the conversation.