
Sew Happy
How to stitch happiness into life during a pandemic
When the pandemic locked down the country I was hit with a lot of extra time. My college classes were moved to online Zoom sessions and not having to spend time in class or on the way to class left me at home feeling the onset of the doldrums. It was around March 11th, 2020 that I first started wearing a mask when out in public. Yes, I was one of those people, the ones that would get weird looks from the other customers. I am sure that they were thinking that us mask wearers were paranoid and I will admit I am an overly cautious person, not to mention OCD, like for real OCD, diagnosed and dealing daily. So with the mention of a mysterious virus that had made its way to my city in less than two months I was worried. I often wonder if other OCD suffers are amateur virologists, watching movies like Outbreak and Contagion, and reading books like The Coming Plague. I began thinking about my friends and family, how were they staying safe? Were they wearing masks or social distancing? Being the next in line as matriarch of our family its just a natural instinct I have acquired, I worry, probably too much. I couldn’t bear the thought of others getting sick and the virus was so new that we didn’t even know the full impact it could have.
March was what I like to call “The Great Panic”, a term I borrowed from one of the greatest planners and “preppers” of all time, Max Brooks. It’s a chapter title from his book World War Z, which focuses on the total chaos the world went into when the zombie pandemic first hit the world. Nobody knew anything, people were hoarding supplies, and officials were all at a loss and contradicting each other’s facts. The same was now happening to our world, minus the zombies. Toilet paper was being snatched up like it was a Black Friday sales item and N95 masks were as rare as unicorns. My aunt, a seasoned RN, who is always the most calm and rational during emergencies was the one to come up with the ingenious idea that would help protect our loved ones from getting sick. Knowing that I had some basic skills in sewing she suggested that I begin making masks.
When I say that I have some basic skills in sewing I mean that I could, at the time, thread a sewing machine and stitch a straight line, and that’s about it. I had never used patterns and didn’t know that certain fabrics required different needles. I couldn’t even end a stitch on the machine. I would just cut the thread and tie a knot by hand, and if you could see me now then know that I am hanging my head in shame by admitting these things. So let’s just say I had the most basic of basic sewing skills.
I began with neoprene fabric and a template, I traced a few adult sizes and cut them out with scissors. One benefit to neoprene is that the edges do not have to be hemmed, but the two pieces do need to be stitched down the middle to make a complete mask. After a few failed attempts I realized that I did not have the correct needle to stitch this type of fabric on my sewing machine, so the first few masks I made were hand stitched with love. Although some would see this as an annoyance, I am actually thankful as this provided me an opportunity to improve my sewing by hand. Next, I wanted to try making a pleated face mask. I tried a few times, but perfecting a pleated mask wasn’t right for me, so I returned to my original template. This style, when using cotton fabric, only needed to be stitched along the outer edges, then turned right side out, and stitched down the middle. Using this method I was able to cut out a template in about 10 minutes and then spend another 10 minutes sewing the pieces together. The finished product was a triple layer mask, with a built-in filter and elastic for ear loops.
There were many times in the mask making process when I made mistake or had an issue with my machine, but I don’t like to think of these occurrences as mistakes, they were opportunities to learn and better myself. Each obstacle improved my sewing and knowledge. I started with the goal of making 3 masks a day and by the end of summer 2020 I making a minimum of ten a day! I gave out masks to friends and family for free and promoted them on social media. I charged a small price for the masks I sold online, so that I could keep buying fabric. However, there were times that I ended up giving the masks away for free if the buyer could not afford to pay. A person’s willingness to keep others safe meant more to me than money for more fabric. During this time elastic was hard to come by, many stores were sold out because other people had the same idea of making masks. I got a little creative by using thin headbands and snipping the elastic to the size I needed. There were also times that I traveled an hour and a half to another city because a store got in a few rolls of elastic. My family made a day trip out of it and it was such a nice treat to get out of the house.
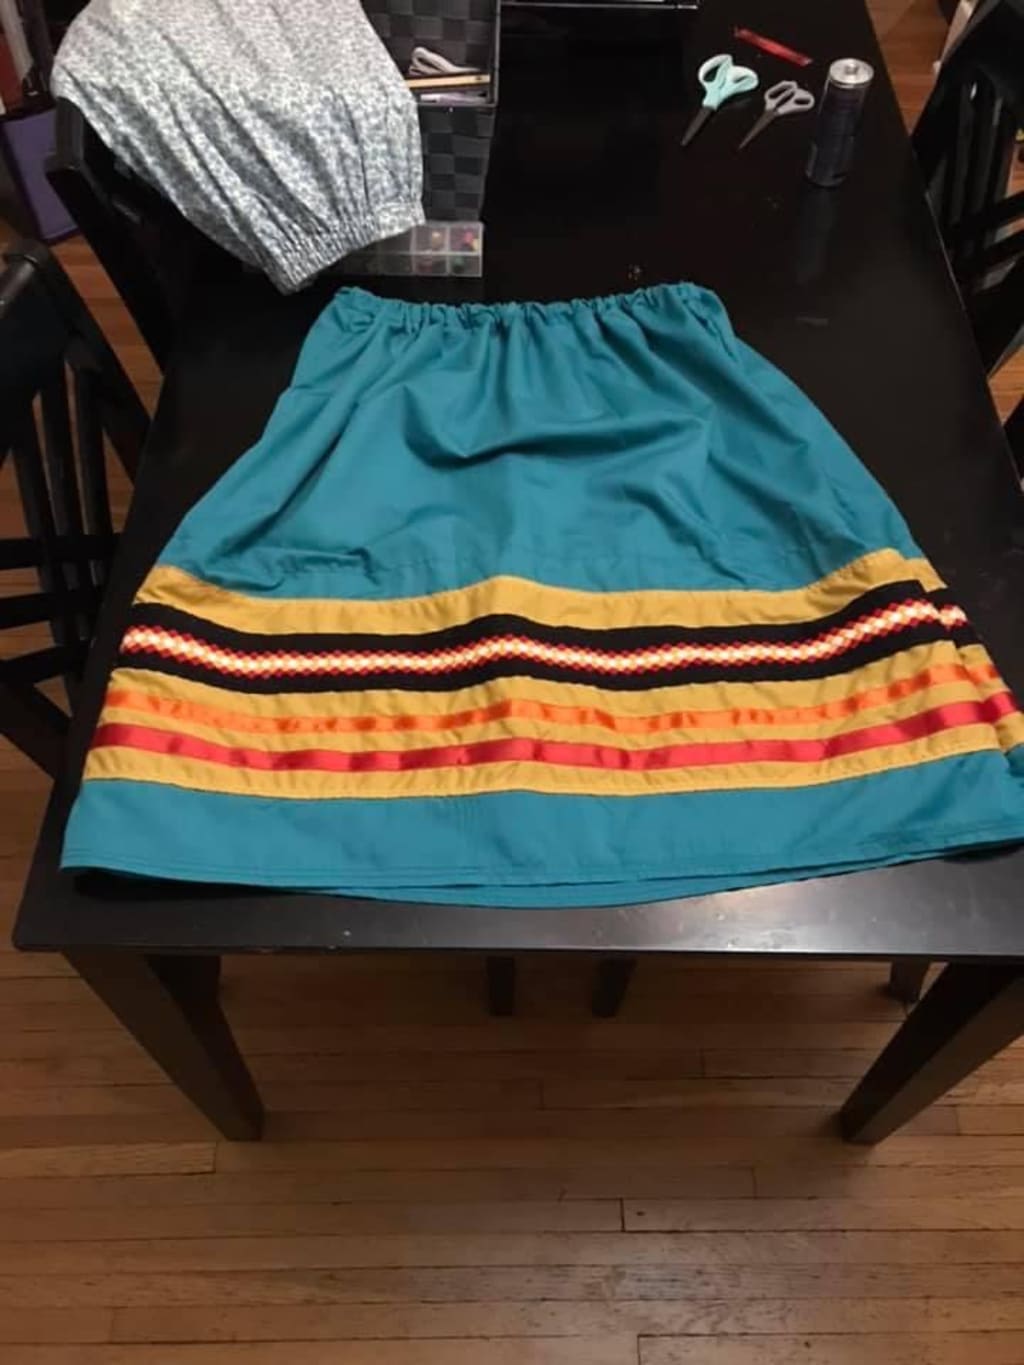
By fall 2020 the need for masks had calm down, stores were able to keep disposable masks in stock and were also selling cloth masks. The demand for my masks was down. I had made, sold, and given away over 400 masks over the spring and summer, but I wasn’t ready to stop sewing. I wanted to continue creating. I found that sewing was a zen like experience, it was the time of the day when I could relax, free myself from stress, and have fun. With 2020 being such a chaotic and stress inducing year I was not ready to cut down on the time I spent at my sewing machine. Sewing had become my “me time”, so I began to think of other things that I could create that I could use as gifts for my loved ones. Christmas was coming up and I wanted to make something special for my aunt. She is like my mother, she raised me and my brothers and supported us our entire lives. I was wanted to make her something special. My family is Native American, members of the Muskogee Creek Nation, and my aunt is very involved in ceremonial traditions. I wanted to make something for her that would proudly display her heritage. I decided to make her a ribbon skirt. Ribbon skirts are ankle length skirts that traditionally have elastic waistbands and flare out at the bottom so that they are wide enough for the female dancers to wear their turtle shell shakers on their legs. Each skirt also has rows of ribbon encircling the bottom or middle length of the skirt.
Although I had never made a skirt, or any other form of clothing, but I was determined to make one and decided to begin November 1st. I was sure that two months would be enough time for me to learn, practice, and perfect a skirt. I first had my brother sneak one of my aunt’s skirts out of her house so that I could examine the fabric and ribbon used, and measure the skirt so that I would sew the correct size. Next, I researched skirt making online. I love living in the digital age, I imagine it would have been a lot harder to sew in the eras before YouTube. I seriously feel that YouTube has about every “how to” video a person could ever need, and even a few that they don’t. There are videos out there about how to open a door and on the proper way to eat a peach! After watching a few videos on how to make a ribbon skirt I was ready for the first official step, cutting and tracing the fabric.
I had collected over 60 different types of fabric since I had started my mask making adventure, for this project I selected a cotton teal fabric and a mustard yellow fabric. The teal would be the fabric to give the skirt its shape and the mustard yellow would wrap around the bottom. Using my yard stick and chalk marking pencil I outlined the shape I wanted for the teal fabric and then cut out the sections that would be the front and back of the skirt. After measuring the length of the mustard fabric I selected the ribbon I would add to this section. I had some Seminole Patchwork ribbon I had been saving for a special project, that was outline with black and featured white, yellow, and red layer fabric. Seminole Patchwork is layered fabric that is sewn together to create transformational geometric patterns. Not very many people have the skills and knowledge to create such delicate work, making patchwork material very difficult to find. Most ribbon skirts do not feature patchwork for this very reason. I wanted to use this precious material because of my love for my aunt, she means so much to me and I wanted to go above and beyond traditional design aesthetics for this skirt. Since my supply of patchwork was limited there was no room for mistakes. When it came time to sew the patchwork ribbon to the mustard yellow fabric I needed to make sure that I took my time and that the stitching was perfect, even, and straight.
To accent the Seminole Patchwork I selected red and orange ribbon to be sewn below patchwork ribbon. I used fabric glue to keep the ribbon in place while I sewed it to the cotton fabric, but I was still nervous about keeping the stitching straight. Too often I see ribbon skirts that have wrinkled and uneven ribbon placement. Out of fear of making a mistake I hand cranked my machine for every stitch. It was a slow process, requiring frequent breaks to rest my hand, but the finished product was worth it, the Seminole Patchwork and accent ribbon were aligned perfectly! Once all the ribbon was attached to the mustard yellow fabric it was an easy step to attach it to the front and back sections of the teal fabric.
During this sewing project I began thinking of my grandmother, she spent a lot of time sewing after she retired. I remember as a child my grandmother had a rule about her sewing scissors, her scissors were to only be used to cut fabric, ribbon, and thread. I used to get annoyed that she never let me use her scissors, but when sewing this skirt I understood why she had this rule. At one point I lost my sewing scissors and grabbed a pair out of the junk drawer to cut a strip of fabric. Although, the scissors were able to cut the fabric the ends didn’t look so clean cut and the shape of the junk drawer scissors make the cutting process a little harder. I was use to the bent handle of my sewing scissors keeping the material flat while I cut and it seemed that my sewing scissors were able to cut all the way to the tip of the fabric as well. Thankfully, I found my sewing scissors and now had a greater appreciation for my grandmother’s scissor rule, a rule that no longer felt arbitrary.
Hemming the bottom of the skirt was another challenge I felt nervous about completing, but with the help of my iron, YouTube, and a little bit of patience I can now say my hemming skills are a few steps up from novice. Next, came hemming the waist section and I had to make sure that I left enough room to feed the elastic through. Perhaps the hardest part of this whole project was inserting the elastic. Frustration grew as I pushed and pulled, yanked and pleaded for the elastic to go smoothly in. For those of you who have ever tried to give your child a haircut or perhaps tried to clip your pets nails, the same level of frustration and desperation were with me the day I battled the elastic. But as author Max Brooks says, “Knowledge does not come from a comfort zone, but from leaving it.”. I eventually got the elastic through, but the whole time I was thinking of how I could find a more effective way to complete this step for future skirts.
Not many skirts have pockets and I have always felt that those that do were superior, and just felt more comfortable. Pockets give us a place to keep our treasured items, items that are too important to be placed in a purse. Pockets also give us nervous types, like me, a safe, comfy, and warm place to put our hands. Maybe its just me, but there are times when I feel like I don’t know what to do with my hands, that is where my need for pockets comes in. Now, as I said, not a lot of skirts have pockets, and since this skirt would be projection of my appreciation and love for my aunt, it had to have pockets. It was back to YouTube to learn how to make pockets for a skirt. I decided that the mustard yellow fabric would be a nice color for the pockets, it would give the teal fabric a nice pop of color and make the pockets easier to find. No need to run hands down the side of the skirt looking for the pocket hole, just look off to the sides for a bit of yellow, and boom, a pocket! The pocket templates were the second to last step in the process, after they were applied all that was left to do was to stitch up the sides of the skirt and I was done. I had given myself two months to complete this skirt, but it had only taken a week. Perhaps the second hardest part of this entire process was waiting to give the skirt to my aunt. There were so many times I wanted to just breakdown and give it to her before Christmas. To keep my mind from talking myself into giving the present early I went back to sewing. I still had plenty of time before the holidays to make more presents for my friends and family. I was also much more confident now! I thought to myself, “I made clothing! I can make anything now!”, and I did! Pillows, make-up bags, beanbag chairs, and so much more! I was no longer filled with anxiety when I tried something new, I was excited, and looked at each project as a challenge to learn a new skill. What had began as a mission to protect my loved ones from a deadly virus had transformed into a passion and quest to learn. Although, I am not yet ready to call myself a professional seamstress, I am well on my way. I am not perfect, there are times when I have to get out my trusty seam ripper and review a few steps, but I am proud that I learned a new skill and and found a hobby to combat the stress, anxiety, and uncertainty this past pandemic year has brought.
About the Creator
Keep reading
More stories from writers in Lifehack and other communities.
Life Between Moves: What Relocating in Schaumburg, Illinois Reveals About Suburban Living
Relocating within a suburban environment often carries a different meaning than moving in a dense urban center. In Schaumburg, Illinois, moving is rarely about urgency or sudden disruption. Instead, it reflects gradual life changes, careful planning, and a strong connection to routine. Understanding how relocation unfolds in this setting offers insight into the village’s broader lifestyle and values.
By House Doctor3 days ago in Lifehack
The Power of One Small Rule
Farhan had tried everything people recommended for self-improvement. Morning routines, productivity apps, motivational videos, strict schedules that collapsed within days. Each attempt began with enthusiasm and ended in quiet frustration. He always blamed his lack of discipline, believing some people were simply born better at managing life.
By Sudais Zakwanabout 4 hours ago in Lifehack
The Lesions of Devotion
Every day I set myself down on the freshly cut lawn and strip myself bare. I take my guitar and finger the frets and pick at the strings, listening for dissonance. My life is dissonance. I twist the tuning pegs until each string sounds bright. Then I kneel, calves pointing behind me, kneecaps facing forward. All exposed to the breeze. I close my eyes and play the melody.
By Paul Stewart3 days ago in Fiction
Foot Bindings
I asked my grandmother how she knew she'd fallen in love. I am not sure I ever did love him, she said. This was before I met my husband. I was naive, a naked spring, a raw nerve of a thing. That cannot ever be me, I knew. Sadness swept in gently like a Moscow thaw. It is no simple thing, looking into a woman's vast soul and seeing its foot bindings. Now, in Italy divorced with my skin singed off, when I say I don't love him mean: I have succeeded at feeling nothing most days and it mostly works. Do you want the comfort of Nothing? Do you want Nothing, too? Be warned: you'll never be free, even when you are nothing. Here is what doesn't work: Accepting the stages of grief. Talking about it. Sitting with the feeling. Missing him—no, the person you were when you believed in death do us part. Writing poetry. That, too. When I say I don't love him I mean: I feel capsized in an endless, starved tide. What sometimes works: selective memory. You must forget ripe tomatoes and his beard and feeling perfectly sheltered in a big blue world. Forget coffee in bed, laughter watching TV, blowing out the candles on the birthday cake and the quiet all-encompassing knowledge that you are chosen. Remember only how love turned to a banal everyday survival act, a trapeze act unsure whether he will catch you, how the warmth stagnated and became sour, remember the foot bindings and remember the resentment boiling in your veins as you stick it out for the kids. Six-hour Netflix binges help, too. A man's fingers tracing your spine. Frozen pizza at 2 a.m. Random trips to the museum just to stand near things that last a while. The realization that crying won’t change anything. Seeing that life is just a dream, and refusing to participate in your own suffering. Bite your fist. Walk on eggshells around joy. When I say I don't love him, I mean he didn’t break my heart, he just stopped touching it and it forgot how to beat right.
By Ella Bogdanovaa day ago in Poets


Comments
There are no comments for this story
Be the first to respond and start the conversation.