
How To Clean A Laptop Keyboard?
Learn how to clean a laptop keyboard safely and effectively using simple tools and steps to remove dust, dirt, and grime without causing damage.

The keyboard is one of the parts of a laptop that is utilized the most and with time collects dust, grime, finger oils, food particles, and other debris. A spotless keyboard extends the life of your laptop and guarantees easy typing in addition to appearing better.
This thorough article will cover how to clean a laptop keyboard effectively, including how to cope with spills and clean in between the keys without pulling them off.
Why You Should Clean the Keyboard on Your Laptop?
For several reasons, keyboard cleanliness is crucial:
Hygiene: You may be at risk for health problems from the bacteria and germs that keyboards can harbour.
Function: Debris and filth might lead to unresponsive typing or sticky keys.
Your laptop's appearance is enhanced generally by a tidy keyboard.
Cleaning your keyboard regularly will help to keep it working and save costly repairs or replacements.
Hardware & Supplies Needed
Get together the following materials and equipment before cleaning your laptop keyboard:
Perfect for cleaning without scratching, the microfiber cloth is soft and non-abrasive.
Isopropyl alcohol at least 70% is used for disinfection and residue removal.
For dust and debris removal between keys, use compressed air.
Accessing small spaces is made easier with cotton swabs.
Dust off and clean up with a soft brush or toothbrush.
Extra debris removal can be achieved with a vacuum cleaner equipped with a brush attachment.
Extra defense against dust and spills is offered by the optional keyboard cover.
Simple, Comprehensive Guide on Cleaning a Laptop Keyboard
First thing to do is disconnect and turn off the laptop.
Very crucial is security. Before cleaning, be sure your laptop is turned off and unplugged from any power sources. This eliminates inadvertent damage and protects you from electrical dangers.
Remove All Unstable Debris
Shake the laptop a little to start to release any particles. Turn the laptop over and lightly touch the rear to help dislodge any dirt or debris that could be stuck under the keys.
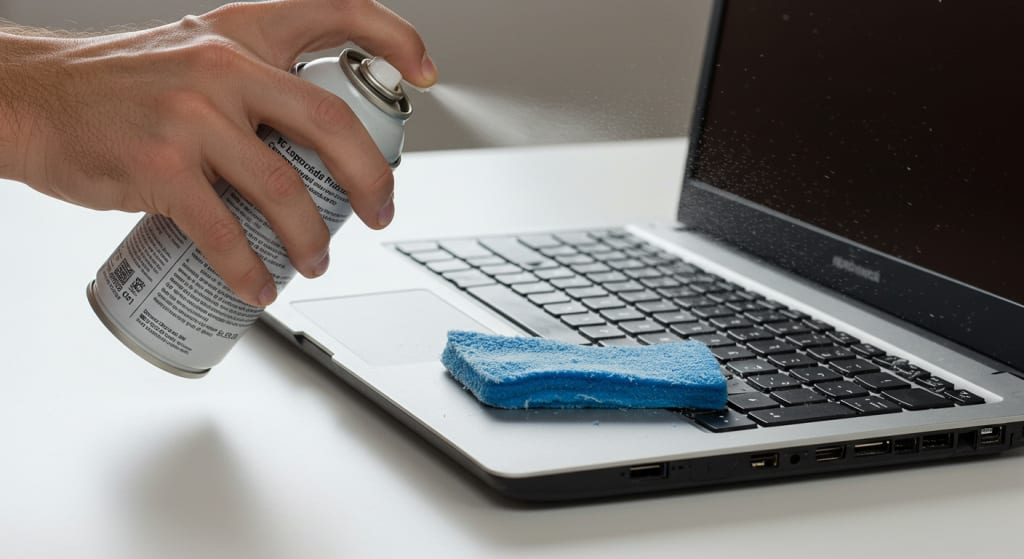
Using Compressed Air
Compressed air is one useful instrument for cleaning a laptop keyboard without removing keys. With brief air bursts held at an angle, dust and other material from between the keys can be blown away.
Moving systematically from left to right and top to bottom, make sure you cover every region. Strive not to blow too hard to prevent harm.
Wipe the keyboard with a microfiber cloth
Dip a microfiber cloth corner in 70% or more isopropyl alcohol. Not soggy; just a little moist. Gently wipe the keyboard, being sure to get at any obvious dirt or grit.
Moving in circular motions will provide uniform cleaning. A lot of moisture might soak in and harm the keyboard.
Wipe in between the keys with cotton swabs
Swab the areas between the keys and their edges with a cotton swab dipped in isopropyl alcohol. Getting rid of sticky residue or dirt is where this really helps. Use care not to break the keys or their mechanisms.
Use a soft brush or toothbrush to go inside cracks
To remove any last bits of dirt or dust, clean in and around the keys with a soft brush or toothbrush. Carefully brush to avoid scratching the keyboard. Smaller debris that compressed air could have missed is helped to be removed by this stage.
The keyboard can be vacuumed
If you'd like, use a vacuum with a brush attachment to get even more dust and debris off the computer. This can be really useful if you have pets or haven't cleaned the keyboard in a while. Set it low to prevent damaging the keys.
Give the keyboard some air time
Before using your laptop, ensure the keyboard has had time to fully dry after cleaning. Every moisture that remains after the cleaning process will evaporate at this point. If necessary, wipe away any excess moisture with a dry microfiber towel.
Run a keyboard test
To be sure your laptop reacts, turn it on and hit each key when the keyboard has dried. Check sure nothing is broken or malfunctioning. If all works as it should, your cleaning process was successful.
Tips for Cleaning the Keyboard of Your Laptop
Consider the following tips to preserve the state of your laptop keyboard:
Clean your keyboard frequently if you use it a lot—more than once a month.
Eat away from your laptop; food crumbs are often the source of keyboard clutter.
Clean hands help keep grease and debris off the keyboard.
For protection against spills and dust, put on a silicone keyboard cover.
When your laptop isn't in use, keep it out of the way or in a case to keep it clean.
Following these tips will help you keep your laptop keyboard tidy and functional as well as prolong its life.
Kindly feel free to offer any more tips or observations on laptop keyboard cleaning in the space provided for comments below. To your cleaning success!
About the Creator
Laptopflora
Welcome to Laptopflora, where laptops meet expertise and your tech decisions are made easier. Our journey began with a single mission: to create a trusted platform that provides clear, actionable, and insightful information about laptop.
Keep reading
More stories from Laptopflora and writers in Education and other communities.
How To Clean A Laptop Keyboard Without Removing Keys?
One of your laptop's most used parts, the keyboard is often soiled by spills, dust, crumbs, and filth. Over time, these elements can build up and cause typing to become slow, sticky keys to emerge, and an overall ugly look.
By Laptopflora9 months ago in Education
Understanding Aerospace Electronic Part Types & Aviation Fasteners: My Perspective on Precision Engineering
When I explore the aerospace industry, I always notice how electronic components, aviation fasteners, and avionics systems work together to ensure aircraft safety and performance. From my experience studying aviation engineering resources and industry databases, these specialized parts are far more advanced than typical commercial electronics.
By Beckett Dowhanabout 16 hours ago in Education
Our Song
Evening has given way to night. Gently, I settle next to you on the comfortable, old love seat and reach for your hand. You snatch it away, again. It cuts me to the quick, but I hide the pain, understanding that the reaction is but part of your demented state. Since the accident, your presence here in our cozy home has been clouded by a haze I can't see. Nevertheless, I feel the frigidity of your expressions and it serves as an excruciating reminder of the immeasurable distance between us.
By Dana Crandella day ago in Fiction


Comments
There are no comments for this story
Be the first to respond and start the conversation.