
Condition is King: A Professional's Guide to Grading Barber Half Dollars
In numismatics, beauty fades first where the metal rises highest. To grade a Barber coin, you must learn to see its history in the lightest touches of wear.

As a Senior Numismatic Analyst, I've held thousands of Barber Half Dollars, each with a story told not in words, but in micro-abrasions. Minted from 1892 to 1915, these coins are a classic series where condition is everything. The difference between a Good (G-4) and an Extremely Fine (XF-40) specimen can be thousands of dollars, all hinging on the preservation of a few critical design elements. This guide will teach you the professional's methodology for identifying wear on a Barber Half Dollar, turning you from a casual observer into a discerning grader.
The Anatomy of a Grade: Why Barber Coins Are So Demanding
Charles E. Barber's design is a masterpiece of fine, high-relief detail. This very artistry makes the series notoriously challenging to grade. The design features—Liberty's cap, hair, and the eagle's breast feathers—are raised sharply from the field. In circulation, these high points made first and sustained contact, wearing down quickly. Unlike later series with more robust designs, a Barber Half Dollar can appear "sharp" to an untrained eye while having lost all its critical detail. Grading them requires a systematic, zone-by-zone inspection under good light with a quality loupe.
Essential Tools for the Task
Before you begin, assemble your toolkit:
- A 5x to 10x Jeweler's Loupe: Essential for inspecting fine details.
- A Stable, Neutral Light Source: Consistent, diffused light is critical. An LED lamp is ideal.
- A Knowledge of the "Key Wear Points": Memorize the targets outlined below.
Step 1: The Obverse (Liberty's Portrait) Diagnosis
The obverse tells the most immediate story of a coin's life. Focus your inspection on three primary areas, moving from highest to lowest relief.
Primary Target: Liberty's Cap and Hairline
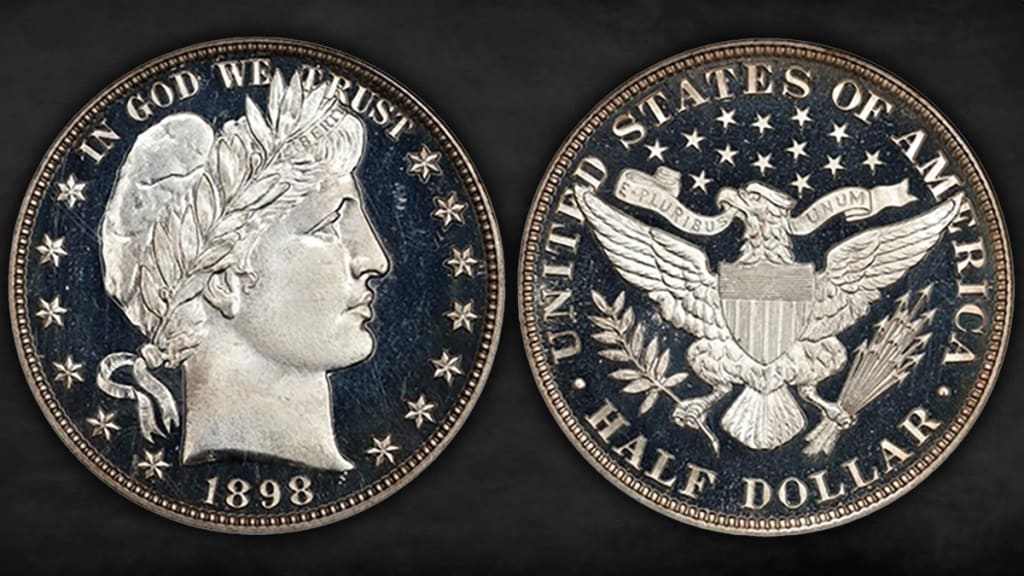
This is the single most important area. The cotton blossom on Liberty's cap and the hair along her forehead are the highest points on the entire coin. Even light wear will first flatten the delicate petals of the cap ornament and soften the sharp hairline. On a heavily worn coin, the cap will be a smooth dome, and the hair will blend indistinctly into the forehead.
Secondary Target: The Cheek and Jawline
Check the curve of Liberty's cheek. On a fully mint-state coin, the cheek has a clean, rounded profile. Wear flattens this area, making it appear broad and less defined. The line of the jaw, where it meets the neck, will also become soft and merge with the field.
Tertiary Target: The Lettering and Stars
Finally, examine the motto "IN GOD WE TRUST" and the stars. While these are more protected, wear will first appear as a loss of sharpness on the letters' tops and points of the stars. On a very fine (VF-20) coin, the letters and stars will be complete but noticeably rounded.
Step 2: The Reverse (The Heraldic Eagle) Diagnosis
The reverse confirms the story told by the obverse. The eagle's breast is the epicenter of wear here.
Primary Target: The Eagle's Breast Feathers
The eagle's breast feathers are a complex, raised area that wears in a distinct sequence. On a coin in Extremely Fine (XF-40) condition, about half to two-thirds of the feather detail will remain. The highest rows of feathers will be worn flat, but the lower, recessed feathers will show clear separation and lines. In Very Fine (VF-20), only the lower third of the feather detail is visible, and it is soft. In Fine (F-12) condition, the breast is almost completely smooth.
Secondary Target: The Claws, Legs, and Arrowheads
Inspect the eagle's left claw (right side as you look at the coin) and the leg feathers. Wear will smooth out the talons and the fine lines of the leg feathers. Also, check the arrowheads in the eagle's right claw; their sharp points are often the first detail to disappear on this part of the design.
Tertiary Target: The Wings and Shield Lines
The horizontal lines on the shield and the fine radial lines on the wings are lower relief. Their preservation is a sign of a truly well-preserved coin. If these fine lines are fully intact, you are likely looking at a coin grading AU-50 or better.
The Professional's Grading Framework: From Good to About Uncirculated
To synthesize your inspection, use this professional framework. The following table translates the wear you observe into a standard numeric grade, which directly correlates to market value.
Final Verification & Advanced Considerations
Once you've assigned a preliminary grade, take these final steps:
- Check the Rims and Fields: Look for carbon spots, corrosion, or cleaning. Any of these can severely diminish a coin's value, regardless of wear. A cleaned coin will often have hairlines or an unnatural, greasy sheen.
- Seek a Second Opinion: For any coin you believe grades XF or higher, comparison is key. Use online image archives from PCGS or NGC to compare your coin to their certified examples.
- Embrace the Tools: For a definitive grade on a valuable coin, nothing replaces third-party encapsulation from PCGS or NGC. Their consensus grading provides market acceptance and liquidity.
Mastering the Barber Half Dollar is a rite of passage for a serious numismatist. It teaches patience, observation, and respect for the fragility of history in silver. By learning to read these key wear points, you don't just assess value—you uncover the coin's journey through time.
About the Creator
Laura Bennett
Numismatist and data science expert passionate about uncovering the stories behind historical coins through analytics. Bachelor’s degree in Archaeology and a Master’s in Data Science from Harvard University. https://coin-identifier.com/
Keep reading
More stories from Laura Bennett and writers in Education and other communities.
Your Digital Numismatic Toolkit: Apps and Software Revolutionizing Coin Collecting
For generations, the quintessential image of a numismatist was a scholar hunched over a desk, a magnifying loupe in one hand and a weighty, leather-bound reference catalog in the other. Identification was a test of memory and meticulous cross-referencing. Today, that picture is being redrawn. The modern collector still has a loupe, but in the other hand is a smartphone, its camera linked to vast digital databases powered by artificial intelligence. The journey from a mysterious coin in hand to a fully cataloged piece of history can now take seconds, not days. This guide will navigate the digital frontier of coin collecting, exploring the powerful apps and software that are streamlining identification, valuation, and collection management for enthusiasts at every level.
By Laura Bennett2 days ago in Education
Professors Are Being Watched: ‘We’ve Never Seen This Much Surveillance’
University professors across several countries are reporting an unprecedented rise in monitoring of their teaching, research, and public speech, raising concerns about academic freedom and the future of open inquiry. From recorded lectures and classroom informants to digital tracking and social media scrutiny, faculty members say the level of surveillance they now face is unlike anything seen in modern higher education. Civil liberties groups warn that the trend reflects a broader climate of political polarization, national security anxiety, and ideological conflict that is reshaping universities into contested spaces where professors are increasingly treated as potential risks rather than independent scholars. “We’ve never seen this much surveillance of faculty,” said a senior researcher at an academic freedom watchdog organization. “What used to be isolated incidents are now becoming systematic.” Monitoring Inside the Classroom In several recent cases, students have recorded lectures without professors’ knowledge and submitted clips to outside advocacy groups or government agencies, accusing instructors of political bias or inappropriate speech. Some professors say administrators have quietly installed additional classroom recording systems or requested access to lecture content in advance. At a large public university in the United States, a history professor described receiving an email from administrators informing him that his lectures would be reviewed after complaints from anonymous sources. “It felt like I was being interrogated rather than evaluated,” he said. “My course is about political movements. That alone seems to make it suspicious now.” Universities defend some monitoring as part of quality control or compliance with harassment and discrimination policies. But faculty unions argue that the line between oversight and surveillance is being crossed. Digital Surveillance and Social Media Scrutiny Beyond the classroom, professors say their online lives are increasingly under watch. Academic tweets, blog posts, and even private comments in virtual classrooms have been flagged and forwarded to employers or politicians. In one case, a professor specializing in Middle Eastern politics faced an internal investigation after screenshots of a social media post criticizing a foreign government were circulated by a political group. Although no formal wrongdoing was found, the professor said the experience was chilling. “You start thinking twice before speaking,” she said. “That’s the point of surveillance—it creates fear.” Cybersecurity experts note that universities now use software that can track email communications, monitor internal messaging platforms, and analyze lecture recordings for “compliance risks.” While such tools were initially designed for data protection and campus safety, they are increasingly applied to content and behavior. Political Pressure and National Security Concerns Governments in several countries have expanded scrutiny of academic institutions in the name of national security. Laws requiring disclosure of foreign research funding, collaborations, and travel have grown stricter, particularly for scientists and political scholars working on China, Russia, the Middle East, and emerging technologies. In some regions, faculty members must report contacts with overseas colleagues or face penalties. Critics argue these measures blur the line between legitimate security concerns and ideological policing. “Universities are becoming extensions of the security state,” said a legal scholar who studies higher education policy. “That fundamentally changes what universities are supposed to be.” The pressure is not limited to authoritarian countries. Democratic nations have also seen increased political involvement in curriculum decisions and research agendas, especially on topics such as race, gender, war, and foreign policy. Impact on Teaching and Research Many professors report self-censorship as a result of constant scrutiny. Sensitive topics are avoided, controversial authors removed from syllabi, and classroom debates tightly controlled to prevent misunderstandings. A sociology professor said she now records every lecture herself for legal protection. “I need proof of what I actually said,” she explained. “It’s defensive teaching.” Graduate students and junior faculty are especially vulnerable. Without tenure protections, they risk losing jobs or funding if accused of violating vague conduct rules. Some universities have also introduced anonymous reporting systems that allow students or staff to flag instructors for “concerning behavior.” While intended to promote inclusion, faculty groups warn these systems can be weaponized for political or personal grievances. Universities Defend Policies University administrators insist that surveillance measures are not meant to suppress ideas but to ensure safety and accountability. Many point to rising threats, online harassment, and campus tensions as reasons for stronger monitoring systems. “We are responsible for protecting students and staff,” said a university spokesperson. “That includes responding to complaints and maintaining respectful learning environments.” However, transparency remains a key concern. Faculty members often do not know when they are being monitored, how data is used, or who has access to recordings and reports. A Global Trend International academic organizations say the problem is growing worldwide. In Europe, new laws regulating “political neutrality” in classrooms have raised alarms. In parts of Asia and the Middle East, surveillance of professors has long been common, but digital tools have made it far more pervasive. “What’s new is the scale and technology,” said an official from a global education group. “Surveillance used to be physical. Now it’s constant and invisible.” The Future of Academic Freedom Legal challenges are beginning to emerge. Faculty unions and civil rights groups are pushing for clearer boundaries between legitimate oversight and intrusive monitoring. Some courts have ruled that academic speech deserves strong protection, but enforcement remains uneven. For many professors, the fear is not just disciplinary action but the erosion of trust between teachers and students. “The classroom should be a place of curiosity and disagreement,” one professor said. “If everyone is watching everyone else, that disappears.” As universities balance safety, politics, and technology, the question remains whether higher education can preserve its core mission: fostering independent thought in an age of constant observation. The answer may determine not only the future of academia, but the health of democratic debate itself.
By Fiaz Ahmed 7 days ago in Education
A New Story About Henry Blair
Henry Blair rose before the sun most mornings, long before the fields warmed under the Maryland sky. As a free Black farmer in the early 1800s, he understood the land as if it were kin — stubborn at times, generous at others, and always demanding more from a man than daylight could give.
By TREYTON SCOTTa day ago in Education


Comments
There are no comments for this story
Be the first to respond and start the conversation.